
This guide is highly detailed. Click your role below if you just want that TLDR version:
![]()
![]()
![]()
Sections:
- What the mechanics are
- When they happen
- How to do them (the strat)
- Other tips
What
This fight involves the boss equipping weapons (Blade/Staff/Bow), which determine the attacks she will use.
Phase 1
- Icicle Impact (Staggered): Covers the ground with 5 circle AoEs including the centre, then another 3 sequentially, leaving only 1 safe spot. Each inflicts a 90s vuln stack
Blade:
- Attack: Serves as her auto-attack. Has a chance to inflict a 2min Blunt Resistance Down stack (makes target weaker to Staff Attacks)
- Icebrand: Group soak cleave
- Heavenly Strike: Raidwide with knockback
- Glacier Bash: Dodgeable cleave with a castbar. Stuns for 4s
- Whiteout: Untelegraphed donut AoE
After equipping, the boss immediately turns to her top enmity target and uses Icebrand. She then repeats the rotation Heavenly Strike → Glacier Bash → Whiteout.
Staff:
- Attack: Serves as her auto-attack. Has a chance to inflict a 2min Slashing Resistance Down stack (makes target weaker to Blade Attacks)
- Hailstorm: Circular AoE markers on 4 targets
- Absolute Zero: Raidwide that’s used periodically
After equipping, the boss immediately casts Hailstorm.
Phase 2
The boss returns to mid and spawns 4 Ice Soldier adds.
- Diamond Dust: The boss disappears and does a raidwide. If any adds are still alive, it’s a wipe
Blade:
Rotation is instead just Glacier Bash → Heavenly Strike.
Phase 3
The boss reappears atop the MT. Icicle Impact now has 2 new patterns instead.
- Icicle Impact (Double): Covers the ground with 4 circle AoEs. After they go off, covers the ground with another 5 circle AoEs including the centre
- Icicle Impact (Loop): Sequentially covers the ground with circle AoEs, first covering the centre, then going in a clockwise/counter-clockwise loop
- Permafrost: Makes the floor slippery, forcing you to slip in a long straight line with each step. Also inflicts an uncleansable 50s DoT (Frostbite). Used at irregular intervals
Blade:
Rotation is instead Glacier Bash → Whiteout → Heavenly Strike.
Bow:
- Glass Dance: 270° cleave that oneshots squishies. Safe area is behind the boss
- Avalanche: Marks a target with a blue marker, then does a line AoE with massive knockback. Used 20s after equipping
After equipping, the boss immediately uses Glass Dance. She will not turn; she stays in the same direction she was in while equipping!
Ice Boulder:
Touching the edge of the arena now jails you in an Ice Boulder. While jailed, you have a DoT (Deep Freeze) that also makes you unable to act. Others can kill it to free you.
When
Phase 1
At <95% HP:
Blade (sometimes Staff instead)
At <90% HP:
Icicle Impact
Blade/Staff (picks the one she hasn’t equipped yet)
Phase 2 at <80% HP
4 Ice Soldiers, Blade
After ~1min:
Diamond Dust
Phase 3
Icicle Impact (Double), Staff
Icicle Impact (Loop), Bow
Repeats from here:
Icicle Impact (Double), Blade/Staff
Icicle Impact (Loop), Bow
Repeat
How
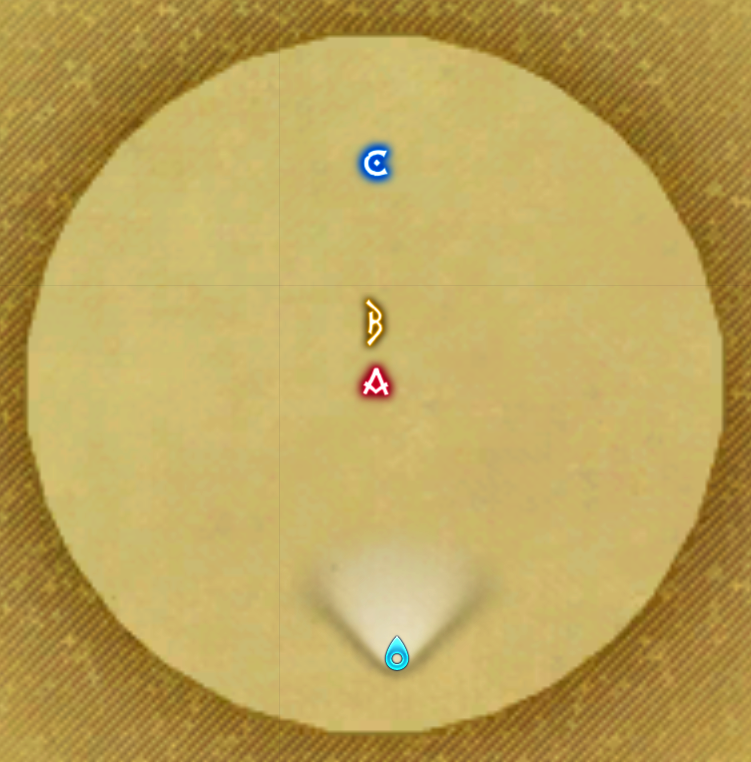
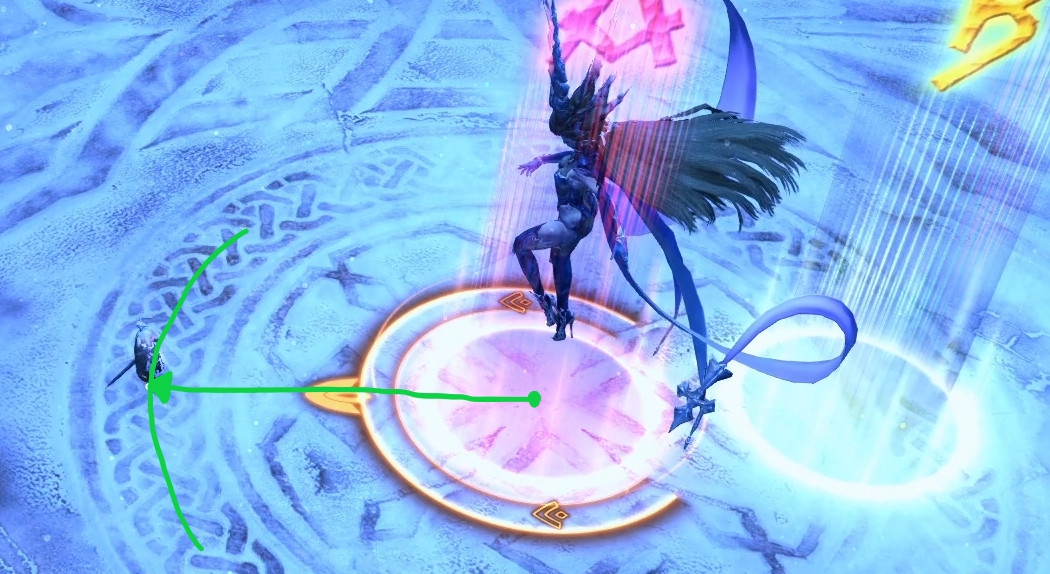
The boss should be on A (mid), and the MT on B. Everyone else’s default state should be to stack behind the boss, to help resolve Glacier Bash & Glass Dance- When everyone is close to the centre, Icicle Impact/Hailstorm is also easier, Whiteout is naturally resolved, and the MT won’t get knocked into the edge by Heavenly Strike
Phase 1
- For Icicle Impact (Staggered), wait in the centre for all circles to appear before dodging. Don’t forget sprint
- Both weapons should be used briefly enough to not require a tank swap yet
Blade:
- While the boss is equipping, the MT should run through her to stack with the party for Icebrand. The MT then goes back to B
- For Heavenly Strike, the MT should hold W to quickly reclose the distance and avoid the boss moving too much
- The MT then waits to dodge Glacier Bash by running through the boss again
Staff:
- While the boss is equipping, everyone should already start to spread for Hailstorm. Don’t wait until you see the markers
- The MT should then reposition the boss back on A
Phase 2
- Remember that there will be Icebrand shortly after the adds spawn! Everyone should stay stacked, while the OT grabs all adds and returns to the stack
- Also don’t forget Glacier Bash
- When the boss disappears, the MT should stand on A so she reappears there
- To keep debuffs separate, whoever the MT is in this phase will continue to tank subsequent Blade equips (phase 2 only has a single Blade equip), while the OT tanks Staff equips in phase 3
Phase 3
- A tank swap at the start is required, since the MT would have gotten many Blunt stacks in phase 2 (phase 3 always starts with a Staff equip)
- Each weapon now lasts ~45s instead of being triggered by breakpoints. Continue to tank swap based on her weapon
- Permafrost is generally used towards the end of each weapon rotation, but not always. The boss sometimes uses it with no weapon, or early in the weapon rotation. She will not use it during the first Staff equip
- Try to stay still once you are in position and not fidget
- During its castbar, the floor will look like a cyclone:
You’ll need to react fast and stop moving immediately. Otherwise, you can easily slip into the edge of the arena and get jailed
Blade:
- Icebrand happens at the start of the second part of Icicle Impact (Double). Stay stacked for the MT to do the group soak before you dodge
- After Heavenly Strike, the MT should reposition the boss back on A
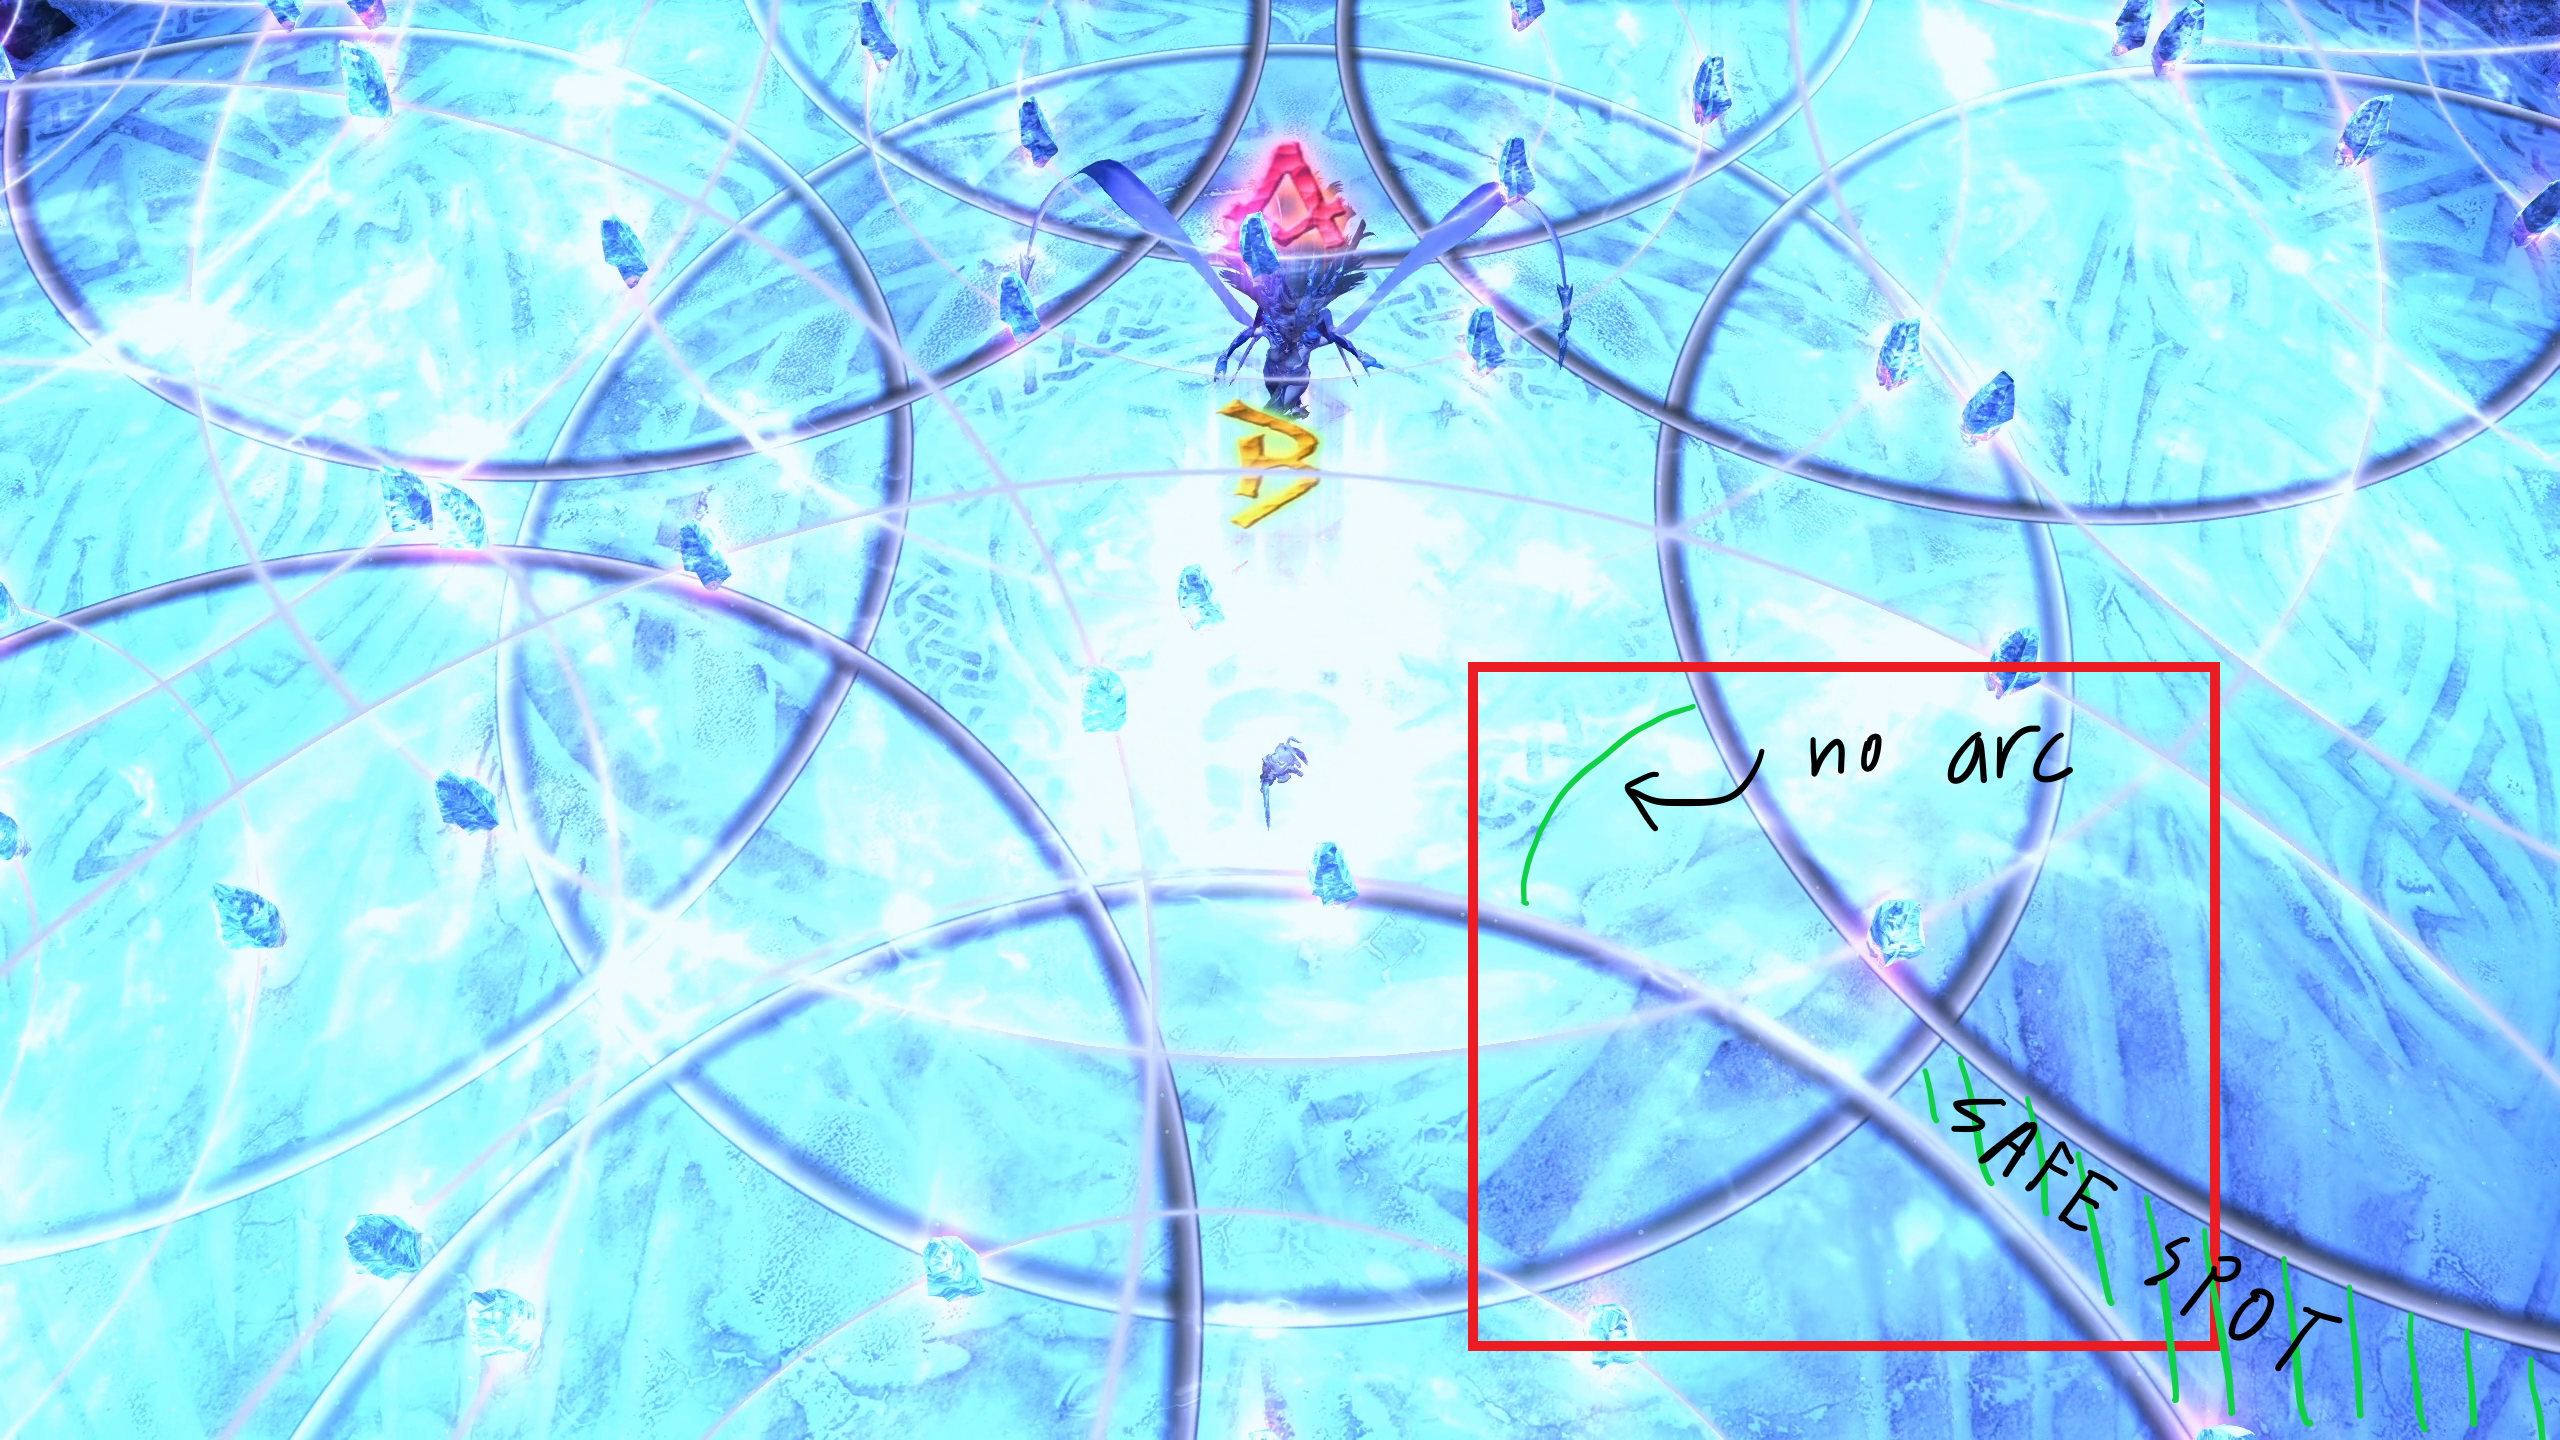
Staff:
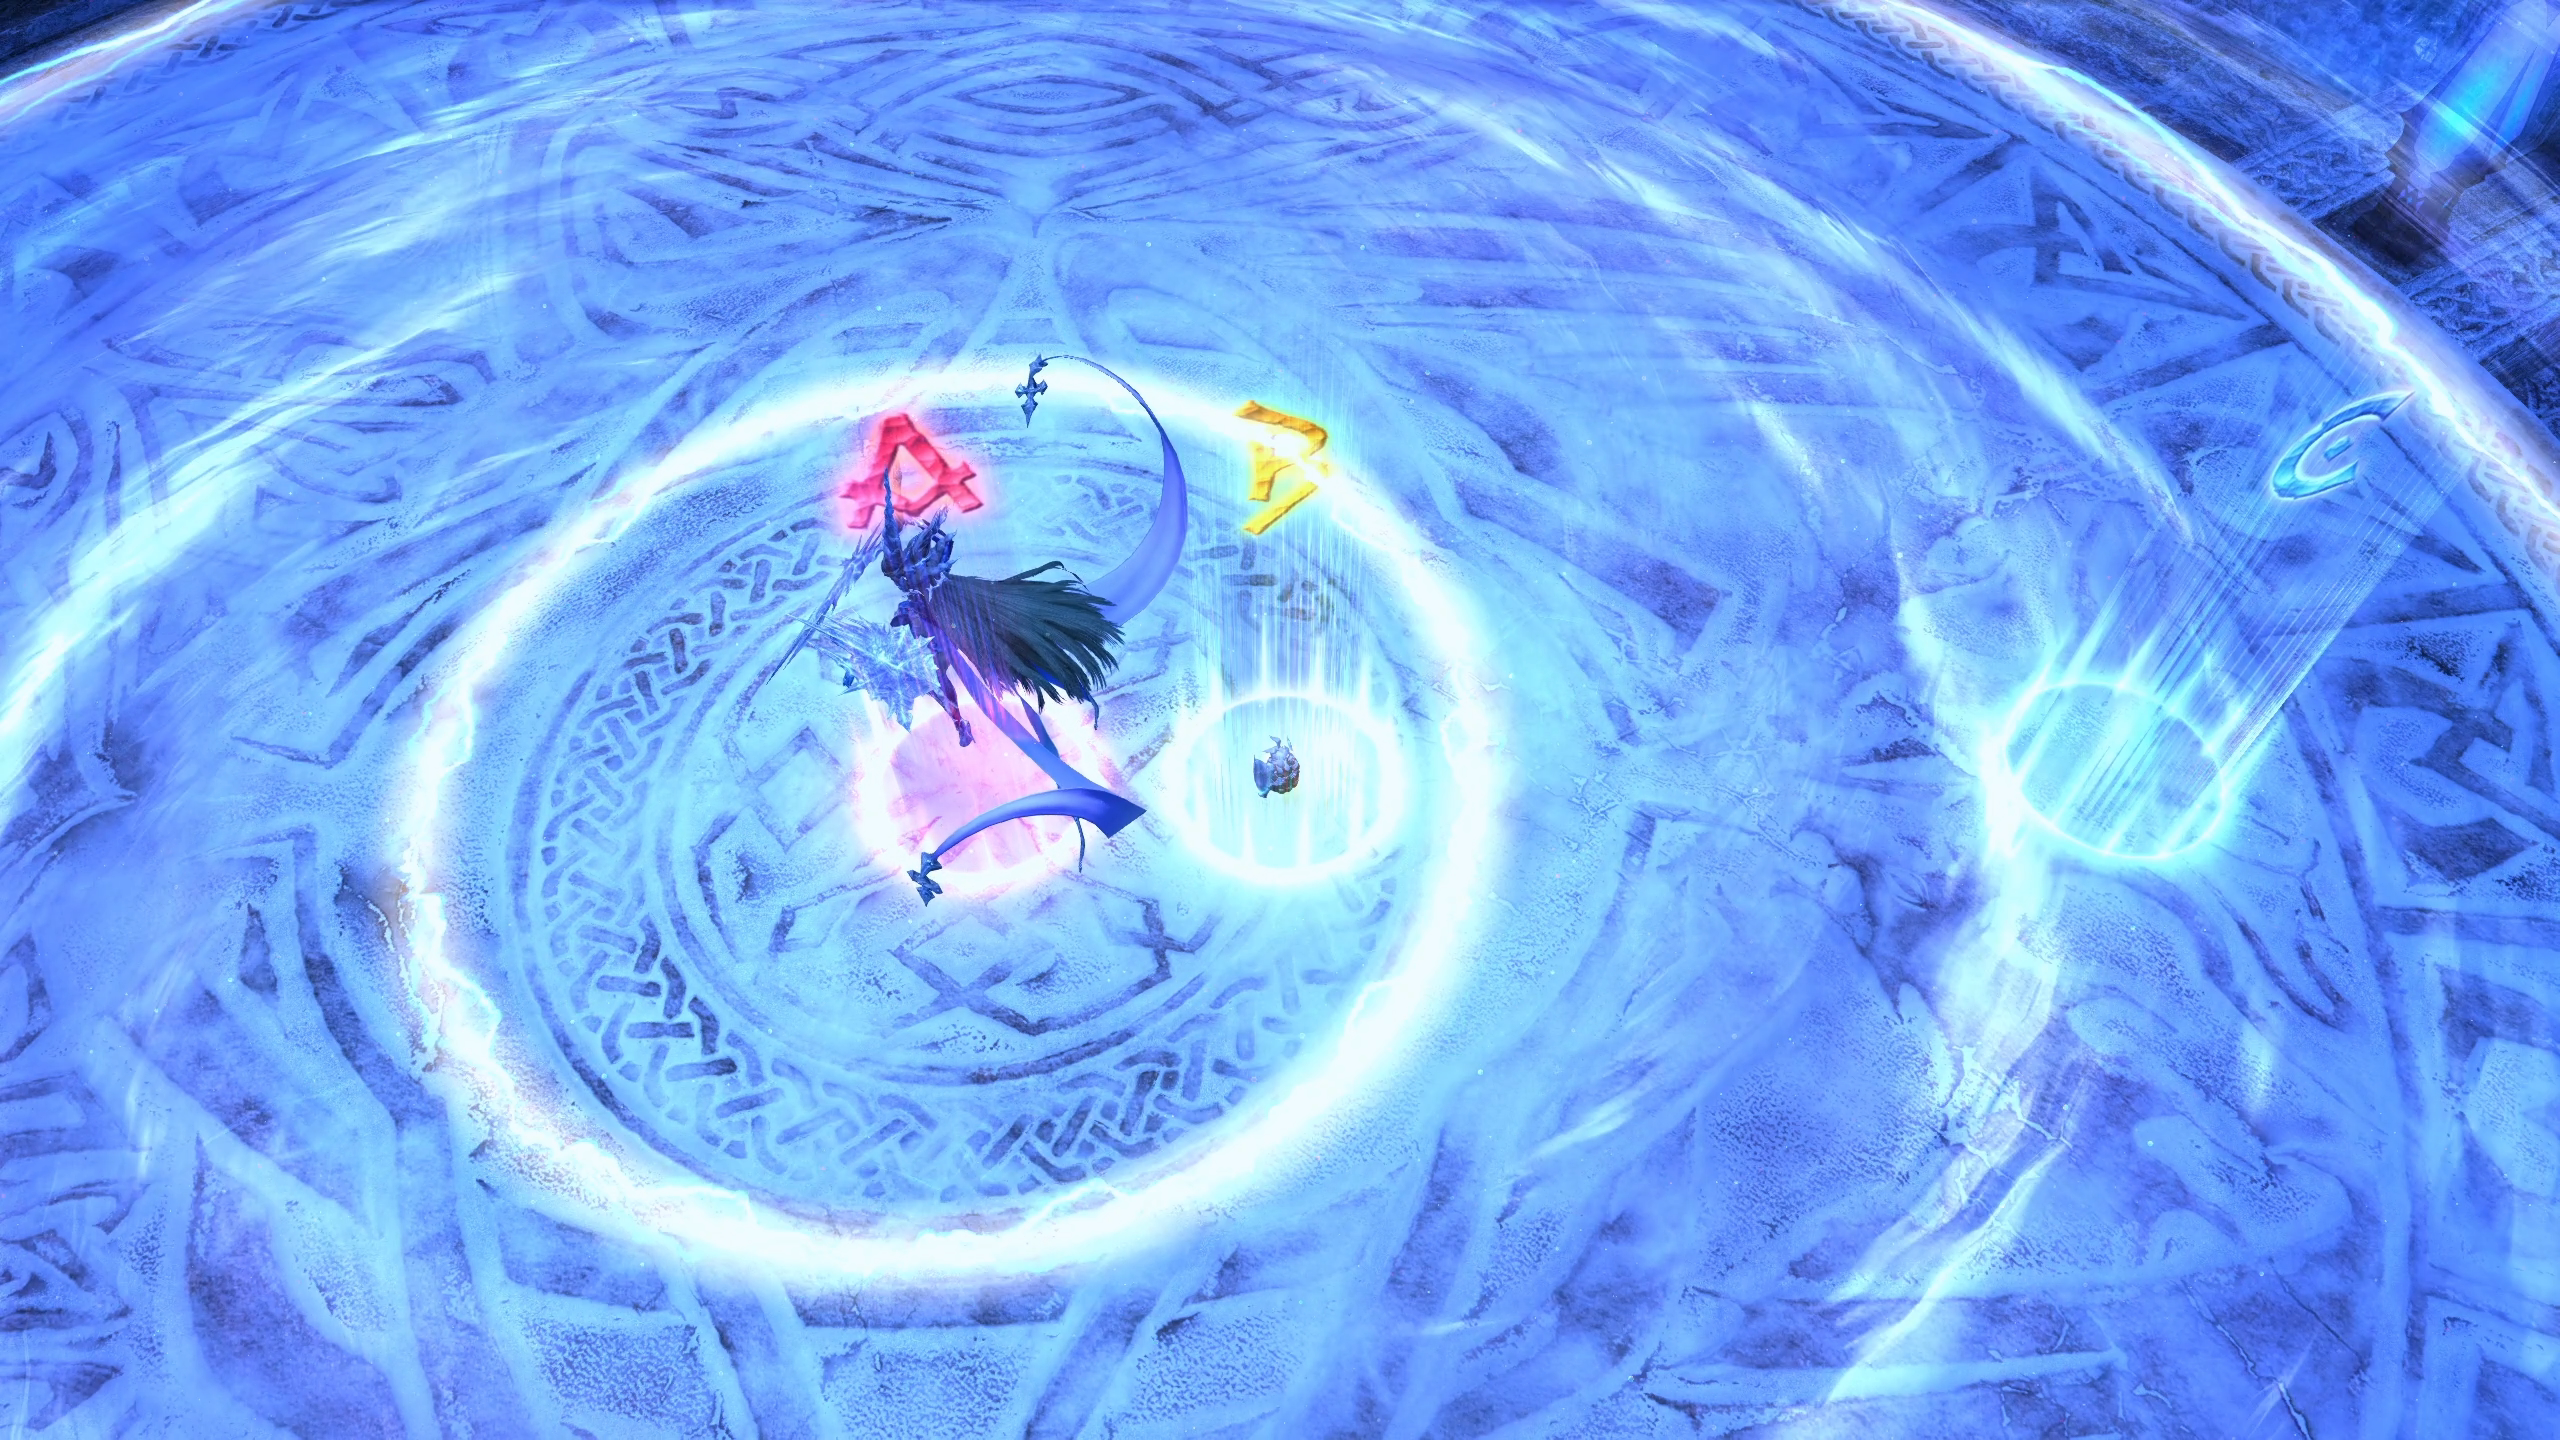
- Hailstorm happens alongside the second part of Icicle Impact (Double). It’s now even more important to start spreading early
- If you reach a safe spot early, prefer running to a corner near the edge of the arena. This way, if you have a Hailstorm marker, you won’t clip people arriving later. Similarly, you won’t get clipped by someone with a Hailstorm marker arriving later.
In the image above, I reached early. If I’d stopped in the middle of the safe spot, all of us would’ve overlapped and died
- If you reach a safe spot early, prefer running to a corner near the edge of the arena. This way, if you have a Hailstorm marker, you won’t clip people arriving later. Similarly, you won’t get clipped by someone with a Hailstorm marker arriving later.
Bow:
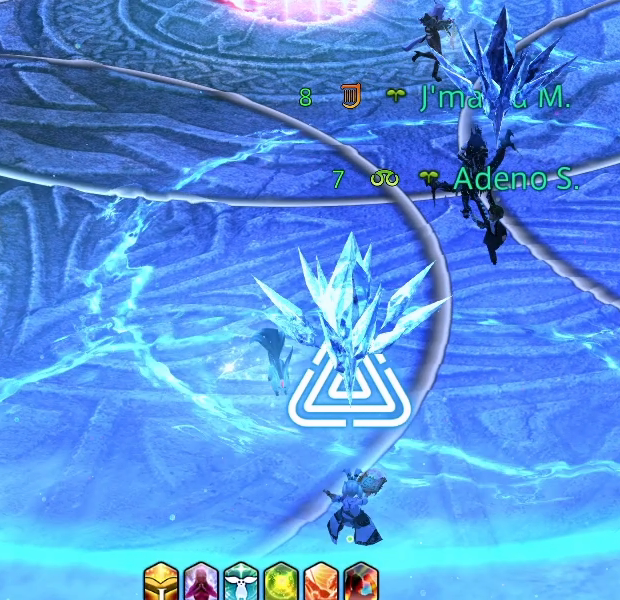
- Remember that there will be Glass Dance shortly after every Icicle Impact (Loop)! Everyone must quickly get behind the boss to avoid oneshot. Don’t forget sprint
- The MT will also be dodging Icicle Impact. There is very little time to turn the boss before she starts equipping Bow and her direction is locked, so be wary as she may be facing weird
- After Glass Dance, the MT should move the boss onto C, facing her outwards. Stack behind her and wait for the Avalanche marker to appear. The target should stand behind her while everyone else dodges. This makes the line AoE only hit the target, who will also have enough space to not get knocked into the edge
- After Avalanche, the MT should reposition the boss back on A
Other Tips
- It’s important to react before the boss finishes equipping her weapon. Watch carefully for her rising animation while equipping weapons. She will only have unique dialogue the first time she uses each weapon
e.g. the MT missing Ice Brand can get people oneshot
e.g. spreading only after seeing Hailstorm can cause a lot of Venn diagrams
e.g. missing Glass Dance can kill a chunk of the party - The boss visibly holds her current weapon, and each comes with a unique buff icon depicting it. You can use this to track her weapon. The buffs have unique effects:
- Blade: Regenerates HP and takes less damage
- Staff: Increases damage
- Bow: Increases crit rate
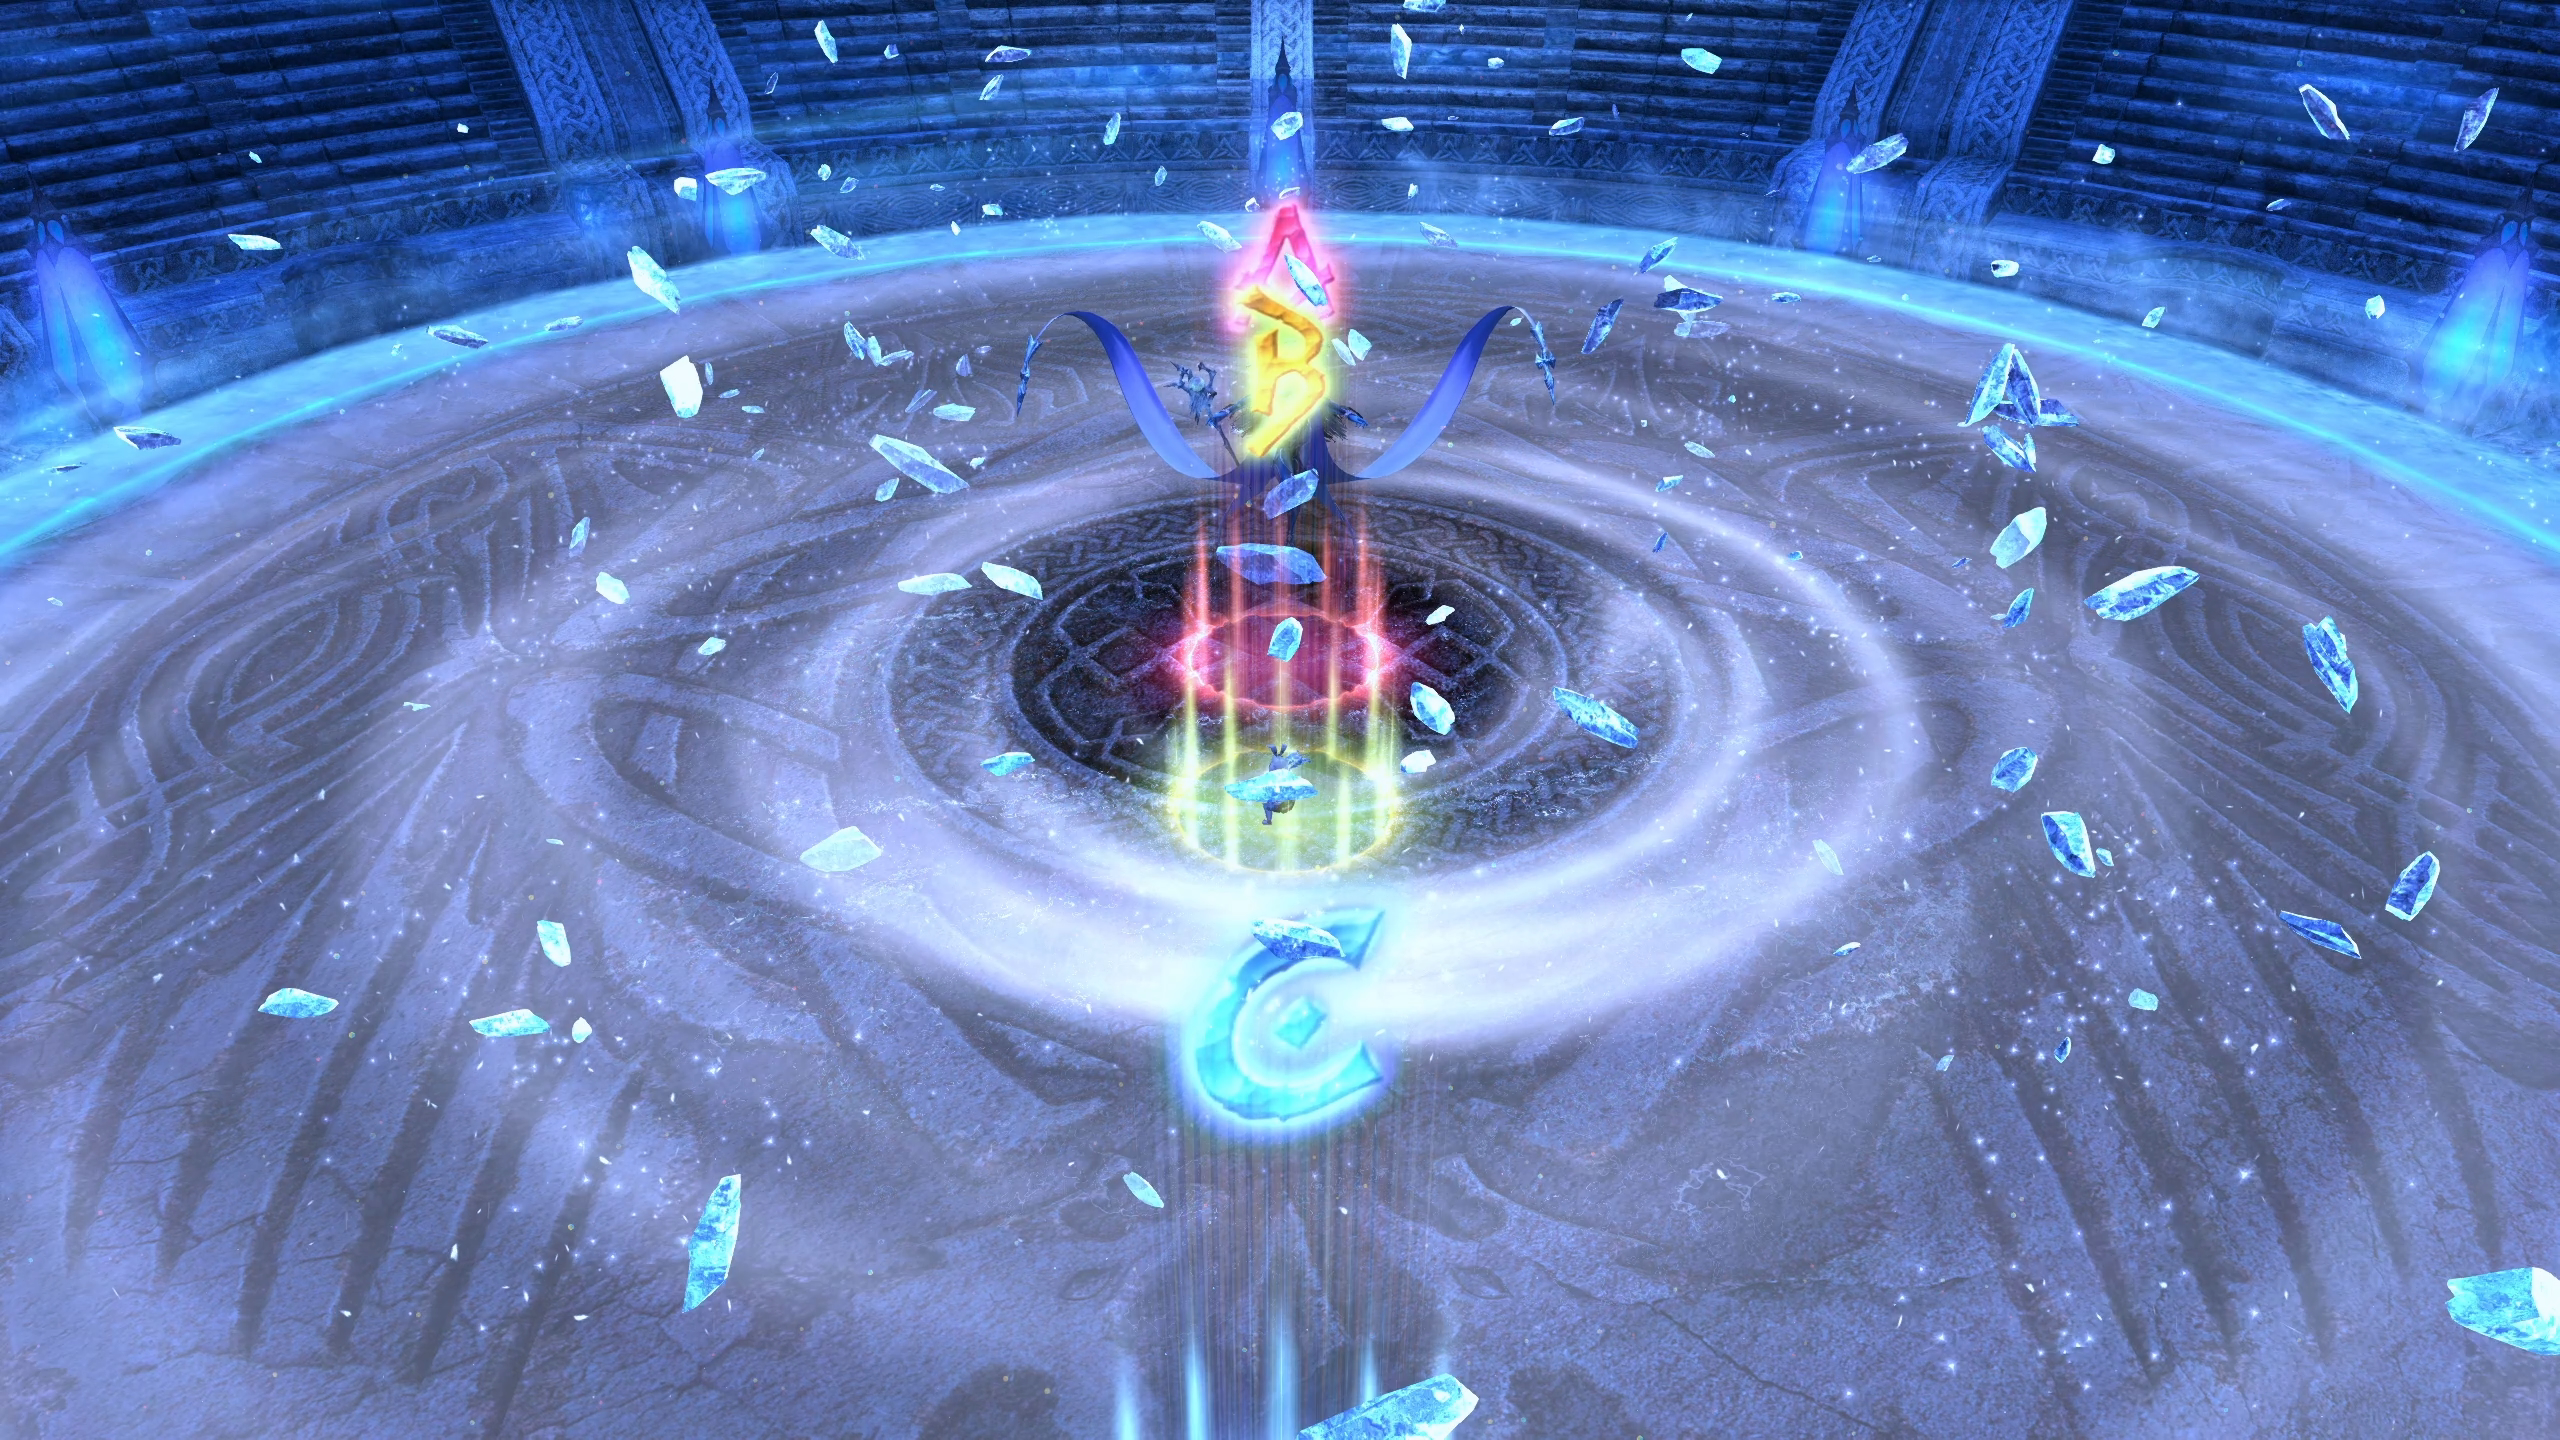
- The ring in the centre of the arena is useful for positioning the boss on A:
It’s also a good gauge of Whiteout’s safe spot:
- The boss gains a buff stack between each equip, which acts as a soft enrage. There is a hard enrage at ~11min
- Arm’s Length/Surecast is not a reliable counter to Avalanche unless you react to the marker on yourself very fast. The buff takes some time to apply, and the knockback snapshots early
- Avalanche & Heavenly Strike will have no knockback if they do 0 damage, such as due to shields or invuln. This is similar to how mechanics in some other fights work
This gameplay video also shows how to dodge Icicle Impact (Loop).