Sections:
- What the mechanics are
- When they happen
- How to do them (the strat)
- Other tips
What
Phase 1
At the start of the fight, there are 3 Scourge of Meracydia adds alongside the boss (Twintania).
Touching the edge of the arena is instant death.
- Plummet: Cleave
- Death Sentence: Tankbuster
Scourge of Meracydia:
- Liquid Hell: Leaves an orange circle on the ground that inflicts an unstackable DoT (Burns) while standing in it. Standing in multiple circles does not increase damage taken
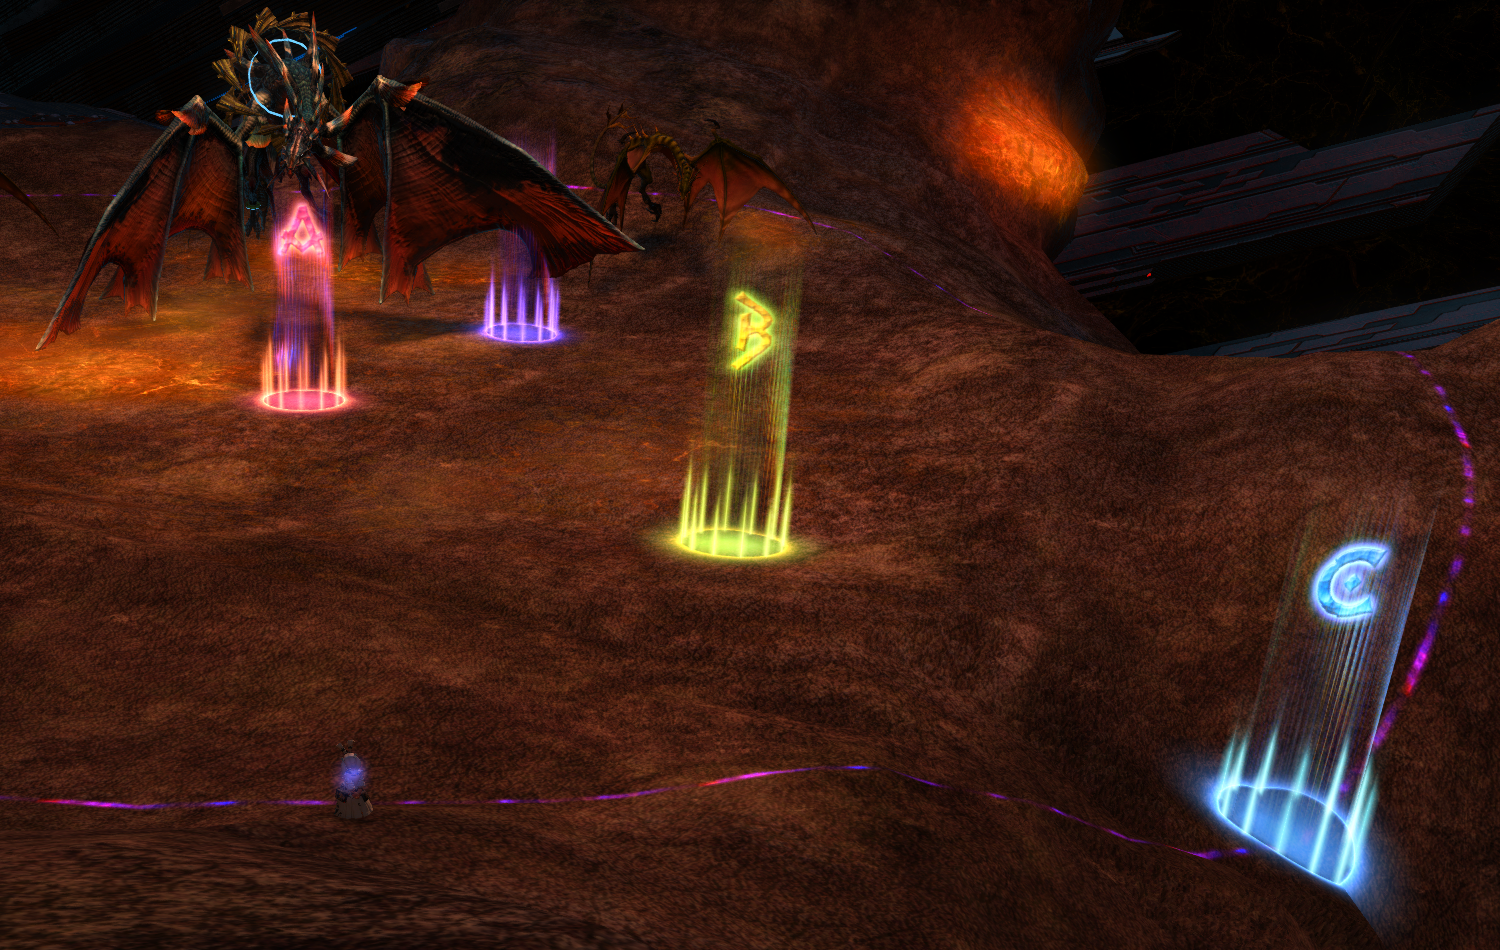
Neurolink:
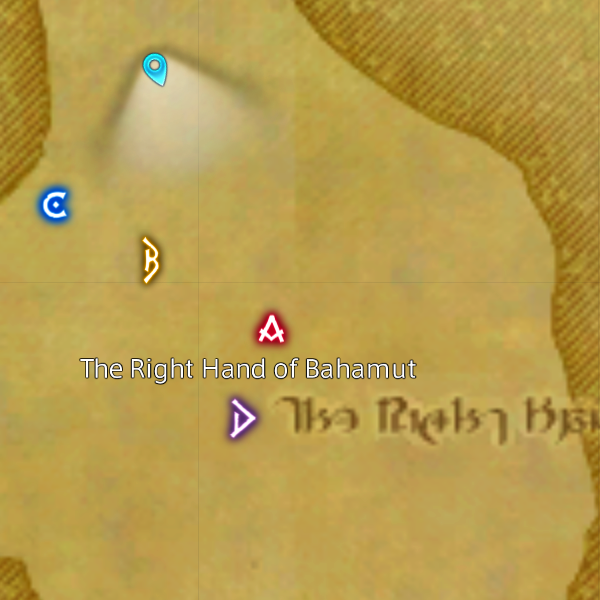
The boss is restrained by 3 Neurolink rings. 1 breaks and drops under her as a persistent black circle at the end of phases 1, 2 and 4.
Standing in it inflicts the Neurolink debuff. This halves your damage dealt and healing received, and makes you move slightly slower. However, it lets you survive Aetheric Profusion & Hatch in later phases.
Phase 2
- Death Sentence: Now also inflicts 15s of Infirmity, reducing healing from spells (but not skills/abilities)
Firestorm:
- Marks a target with a blue marker for 3s, then traps them in a Conflagration. Does not target the first/second enmity
- Conflagration is a circular jail the same size as the boss’s hitbox that always faces south. Anyone in range when or after it spawns will also get trapped
- Conflagration will explode if not killed in time, dealing massive damage to everyone trapped inside (oneshots squishies)
- Trapped people suffer a weaker Burns DoT, but are otherwise immune to damage. If a trapped person dies to the DoT, the Conflagration immediately explodes
Fireball:
- Marks a target with a red marker for 5s, then hits them with a group soak AoE. Does not target the first/second enmity
- At least 4 people are needed for the stack to survive
- The boss gets a 25s stack of Waxen Flesh for each person hit, visualised with an orange tether
- Waxen Flesh: Each stack shortens the time before Conflagration explodes (1 stack = 43s; 2 stacks = 28s; 3 stacks = 15s; 4 stacks = 12s; 5 stacks = 10s; 6 stacks = 9s). Stacks are checked when Conflagration spawns to determine its explosion timer
- If the target goes into a Conflagration to get trapped, Fireball is skipped and Conflagration’s timer restarts
Phase 3
This is the adds phase during which the boss disappears for Divebombs. She no longer uses Firestorm/Fireball.
At the end, she reappears on D for Aetheric Profusion.
- Divebomb: Marks a target with a green marker and remembers that location. The boss appears at a random spot near the outside of the arena from which she has line of sight on it. 2s later, she dives at it in a line AoE with massive knockback. Does ~80% HP to squishies
- Aetheric Profusion: Special raidwide that must be mitigated by standing in a Neurolink to survive
Hygieia:
- Disseminate: Inflicts a 40s vuln stack on everyone nearby (including other adds). Used at 1 HP before dying
Asclepius:
Bigger, high-health add.
Phase 4
The boss periodically spawns a Dreadknight add near A.
- Twister: Remembers 3 targets’ locations at the end of the castbar, then spawns twisters there that last for 5s. A twister triggers when stepped on, instantly killing everyone on it and doing a large AoE with massive knockback (does ~65% HP to squishies)
- Unwoven Will: Stuns the Dreadknight’s target whenever it fixates on someone (explained below). The stun lasts until the Dreadknight is killed
Dreadknight:
Fixates on a target, moving towards them slowly. Fixates on a new target if the current target dies. Cannot be slept/bound, but can be stunned/heavied.
- Caber Toss: Instantly kills its target when it reaches them
Phase 5
The boss no longer uses Twister/spawns Dreadknights.
- Liquid Hell: Now used 5 times in a row on the same target and has no castbar
Oviform:
Marks a target with a triangular marker when it spawns, and homes in on them. Cannot be attacked.
- Hatch: Detonates in a small AoE that deals massive damage (oneshots squishies) unless mitigated by standing in a Neurolink. Used when it collides with anyone
When
Phase 1
7s: Plummet (repeats every 13s)
18s: Death Sentence (repeats every 35s)
Phase 2 at <85% HP
8s: Fireball marker (repeats every 25s)
28s: Firestorm marker (repeats every 35s)
Phase 3 at <55% HP
3 Divebombs
Asclepius, 2 Hygieias (near C)
50s after the 3rd Divebomb marker:
3 Divebombs
2 Hygieias (opposite C)
~70s after the 6th Divebomb:
Aetheric Profusion
Phase 4
0s: Plummet (repeats every 13s)
4s: Twister (repeats every ~21s-36s)
10s: Dreadknight (repeats every 40s)
Phase 5 at <30% HP
7s: Oviform (repeats every ~8-13s)
11s: 5 Liquid Hells (repeats every 18s)
How
Phase 1
The MT should ignore the adds and grab the boss, positioning her on A and facing her away. Do this quickly before she uses Plummet to not cleave the party- We aim to drop her first Neurolink on A
- The OT should grab the adds and move them away from the boss. Adds should be killed first
- A healer should be assigned to each tank for when both are taking damage. I recommend the shield healer pocket the MT
- Healers need to keep the MT topped up, as attacks can crit. Otherwise, the MT will likely die suddenly
- The MT must mit tankbusters. DPS should help with their group mits too. Death Sentence is usually followed by Plummet, which is a lethal combo, especially with auto-attacks
Phase 2
Handling Fireball:
- We aim to have no more than 4 people soak Fireball to not make Conflagration harder
- 4 dps should stack to the bottom right of the boss as their default state. There will sometimes be less dps stacked due to Conflagration or deaths
- We prioritise dps getting hit as they have more health than healers, and healers will get interrupted by the damage. The OT will be busy with timely tank swaps and pointing cleaves away
- 1 dps should be assigned the task of leaving the stack if there are too many people. The healers should be assigned a priority for who joins the stack first if there are too few people
- To keep things simple, these 3 people should only adjust after the Fireball marker appears. We don’t need to keep adjusting in between Fireballs, and we don’t want edge cases like the first healer joining the stack, then the second healer getting marked
- When the Fireball marker appears, if Conflagration is up, the target should just go in and get trapped too (skips Fireball, restarts Conflagration’s timer)
- Otherwise, the marked target must stay stacked/join the stack. Any dps who aren’t stacked properly should get in position too. Then, adjust based on how many are now stacked.
e.g. if 4 dps are stacked (dps marked), don’t move.
e.g. if 4 dps and 1 marked healer are stacked, the assigned dps should leave.
e.g. if 3 dps are stacked (dps marked), the first healer should join.
e.g. if 2 dps are stacked (dps marked), both healers should join - Afterwards, reset your positioning and repeat. i.e. all dps should stack and healers should unstack
- After the first Fireball, the MT should move the boss onto B. We aim to drop her second Neurolink on B
- The MT should face the boss towards C while the OT stands to the left of the boss
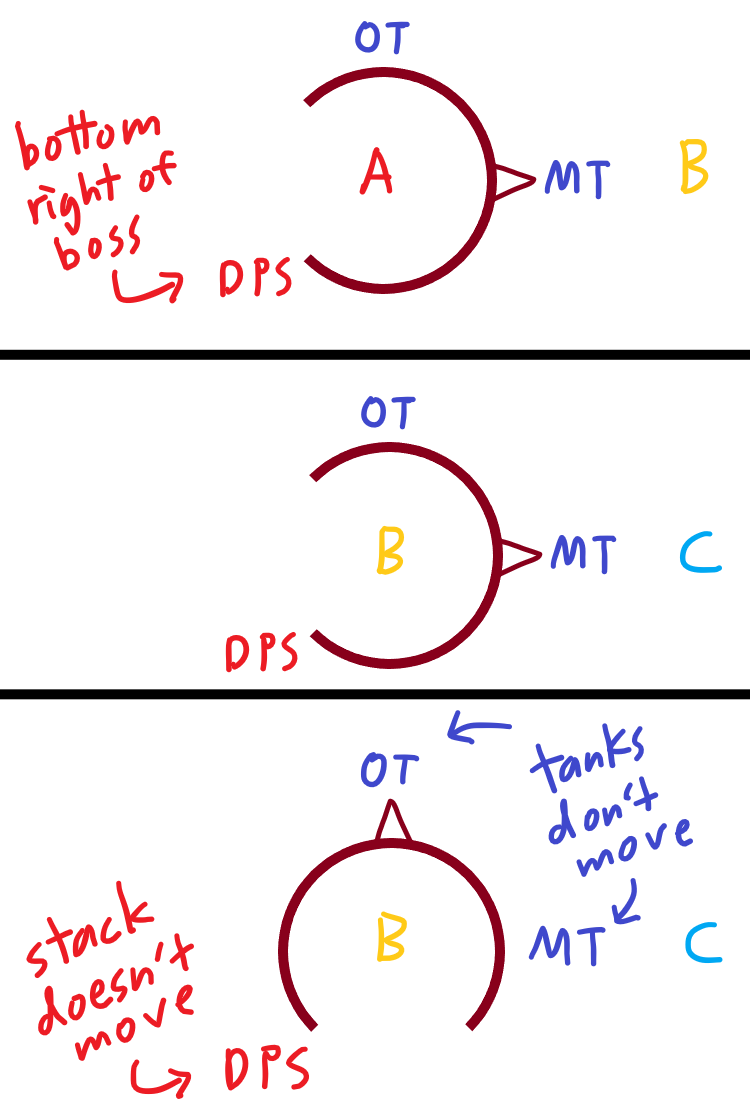
- This allows clean tank swaps - neither tank has to move and Plummet won’t cleave both tanks right after the swap. This is similar to how we handle Flare Breaths in T13. Meanwhile, dps can stay stacked in the same spot and hit positionals regardless of who’s tanking, including on Conflagrations
- Tank swap during each Death Sentence castbar. Infirmity makes the combo even deadlier
- When the Firestorm marker appears, the target should sprint under the boss so everyone can reach the Conflagration. Everyone should switch to killing it asap
Phase 3
- The moment the boss disappears, everyone should run to C and stack tightly. Go as close to the edge as possible (but be careful not to die to the edge)!
- When a Divebomb marker appears, immediately run to touch B, then go back to C for the next Divebomb
- The idea is to bait the Divebombs into the ditch and out of the arena. As long as everyone stacks close enough to the edge, what could otherwise be the hardest mechanic of the fight becomes very easy
- If people are late to stack such that the Divebomb marker appears anywhere other than on C, then nobody is safe and it’s up to RNG. Everyone should pop Arm’s Length/Surecast and continue getting to C
After the first 3 Divebombs:
- The MT should grab Asclepius. The OT should grab the Hygieias. Stay near C and kill the Hygieias first
- The MT should position themself such that when a Hygieia dies, Asclepius will get the vuln but they won’t
- Just before each Hygieia dies, everyone should move away so they don’t get vuln stacks
- Once both Hygieias are dead, everyone should stack back on C to prepare for the next set of Divebombs, while still hitting Hygieia
After the last 3 Divebombs:
- Everyone should run back to mid. The OT should go opposite C to bring the 2 new Hygieias over. Kill them first and handle their vuln stacks like before
- Finish off Hygieia, heal/shield up, then get into the Neurolinks and wait. The MT should be alone in the A Neurolink, while everyone else stacks in the B Neurolink (the boss will combo Plummet right after Aetheric Profusion)
- The MT should mit the combo in advance
- Check the enemy list to see who has aggro! If the MT died earlier, they must Provoke when the boss reappears, or she will cleave the whole stack to death
- After Aetheric Profusion, everyone should leave the Neurolinks quickly so their healing received is no longer halved
- Do not leave the Neurolinks early! Wait for the raidwide damage, not the reappearance animation
Phase 4
- The MT should keep the boss on D. We aim to drop her last Neurolink there
- Spread out to prepare for Twisters, while also staying away from A to prepare for Dreadknights
- Everyone should keep moving whenever they see the Twister castbar. Don’t stop until you see where twisters have spawned
- Set the boss as your focus target to watch for the castbar, even while handling Dreadknights
- You can try moving in a wavy line. Don’t retread your own or others’ steps. Stay away from others, as you can easily get yeeted into the edge by someone else’s triggered twister and vice versa
- The MT should try not to shift the boss while moving, but it’s normal to turn her
- It may be helpful to have a Twister callout, such as via macro:
/p Twisters, keep moving! <se.6><se.8>
- Save your burst for Dreadknights. When it spawns, everyone should immediately switch to killing it, while also running away until its target gets stunned. Then, it should be chain stunned and burnt asap
- The OT can leave to help using Low Blow, but should otherwise continue to be ready for tank swaps like in phase 2
Phase 5
- The OT should get into the D Neurolink the moment it drops, to collide with all Oviforms when they spawn
- The OT should stand in the part of the Neurolink behind the boss so Plummet doesn’t cleave them
- The MT must keep the boss centred over the Neurolink to ensure Oviforms don’t get past the OT
- Everyone should stay spread so Liquid Hell doesn’t hit multiple people. If you get targeted, drop the circles out of the way
- If the OT dies or needs to leave for Liquid Hells, a melee should temporarily take over in the Neurolink
- If the MT gets targeted for Liquid Hells, they should pop invuln and drop all 5 in the same spot, then turn the boss
- If the area around D is hopelessly covered in Liquid Hells (especially if the D Neurolink is covered), then as a last resort, the MT may sprint to use a different Neurolink right after a Hatch
Other Tips
- The boss’s aggro range is massive at 30y. This almost covers the entire arena, so don’t get too close
- You can pre-pull mage LB
Phase 1:
- The initial pull is a little tricky. Both tanks should run in together with stance on. The MT should only use single target attacks on the boss, while the OT AoEs everything. This way, each tank will be able to maintain aggro on their respective targets
- The MT can turn the boss if she gets covered by Liquid Hells, to help melees hit positionals
Phase 2:
- If the MT is about to die (e.g. a healer is trapped) and Conflagration is up, they can go in for the damage immunity
- Conflagration’s timer can be janky, especially if the boss is busy with other queued attacks or gets stuck due to her top enmity target being trapped
- When a Fireball marker gets trapped, the timer tends to restart only after a delay, and sometimes doesn’t restart at all
- When the timer runs out, the explosion is sometimes delayed, and the delay can even be long enough to give you ample time to kill the Conflagration
- I come to this conclusion after extensive analysis of hours of progs and unsync testing. The times corresponding to Waxen Flesh stacks I give above are the most sensible I could conclude with
- If you are struggling with Conflagration killing people, such as due to too many getting hit by Fireball, try to save your burst for it
- Squishies soaking Fireballs can be good for LB generation due to surviving with little health
Phase 3:
- If a Conflagration is up when the boss leaves, prioritise stacking on C over killing it
- Be sure to use the correct ditch when setting waymarks for C
- When stacking on C, healers can use Rescue if someone is far away, but be careful not to kill them due to the movement lock
Phase 4:
- Rescue doesn’t work on a Dreadknight’s stunned target, unlike in Ramuh
Phase 5:
- It’s possible for the OT to peek outside the Neurolink for about 2 GCDs after each Hatch, to make it easier to heal them up and do more damage, but only do this if you are confident you won’t die from mistiming it
- If you are new to MINE ARR content like this, note that the philosophy for healers is very different. Healers will spend a lot of time casting MP-efficient GCD heals, especially if new people are taking a lot of damage. Your priority is to keep everyone alive as opposed to squeezing in damage
About outdated strats:
- It’s not feasible to run this with 1 tank MINE, but damage shouldn’t be a problem
- Pets no longer have their own healthbars and don’t count for mechanics
- The OT should not be chilling behind the boss. They will need to tank swap, and doing this can easily cleave the party and ruin positionals
- If your damage is good, you should only see 2 Firestorms
- Adds in phase 3 shouldn’t be a problem. There’s no need to keep Hygieias alive, stagger vulns, or dps LB. Tanks should stack with everyone on C, and later you should be left with plenty of time waiting in the Neurolinks
Special Thanks
- Sakura Akiyama @ Ravana for help testing phase 4 mechanics
- Adol Cleria @ Sophia for Conflagration timer jank discussion