
This is a partial guide which only covers the last, hardest phase.
Sections:
- What the mechanics are
- When they happen
- How to do them (the strat)
- Other tips
What
- Raven Dive: The boss dives onto a target, dealing light AoE damage
- Lunar Dynamo (aka donut): Donut AoE that lifesteals
- Iron Chariot: Large AoE with knockback
- Thermionic Beam: Marks a target with a red marker, then hits them with a group soak AoE
- Meteor Stream: Marks 4 targets with a white marker, then hits each of them with an AoE. Used twice in a row (may get marked both times)
- Dalamud Dive: The boss reappears atop the MT, dealing high AoE damage
Phase 4
- Bahamut’s Claw: Tankbuster. Now used 5 times in a row
- Super Nova (aka blackhole): Spawns a blackhole under a target, which repeatedly pulls in everyone in a small AoE, dealing damage and inflicting 5s of heavy. Now used 3 times in a row
- Bahamut’s Favor: The boss gains a buff stack. 3 dragons spawn outside the arena
Dragons:
These adds cannot be attacked, and do ice/fire/thunder mechanics. Towards the end of the rotation, they instead do divebombs before disappearing. There are 3 possible spawn patterns, which determine where their dives start from.
- Iceball: Cycles through a target every 3s, inflicting 85s of Icebitten
- Fireball: Marks a target with an orange tether, then hits them with a small AoE, inflicting 45s of Firescorched. Used every 12s
- Icebitten/Firescorched cancel each other out, but are lethal if their target already has the same debuff
- Chain Lightning: Inflicts 5s of Thunderstruck on a target. Used after each Fireball tether
- Thunderstruck: On expiry, anyone near them takes high damage and suffers 30s of uncleansable paralysis
- Cauterize (aka divebombs): Marks a target with a green marker. When it disappears, remembers that location. 1-2 dragons then simultaneously dive at it. Each does a line AoE, dealing high damage with massive knockback
- This is used twice in succession. The first green marker always has 2 dragons dive it; the second green marker has the 1 remaining dragon dive it
- By starting north and counting the dragons clockwise, we can tell regardless of pattern that the first 2 dragons to be counted will dive first. However, there’s a much easier way to resolve divebombs (explained in How)
When
Phase 4 at <47% HP
Favor, 5 Claws
Fireball 1
Raven Dive, donut
Fireball 2
Fireball 3
Chariot
Beam, 3 blackholes
Fireball 4
5 Claws
Divebombs 1
| Odd Rotation | Even Rotation |
|---|---|
| Meteor Stream 1 | Chariot |
| Divebomb 2 | Divebomb 2 |
| Meteor Stream 2 | Raven Dive |
| Dalamud Dive | Donut |
Repeat
How
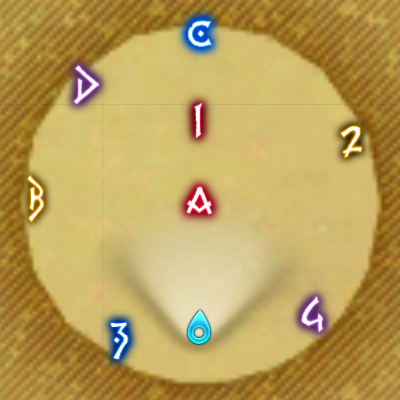
Waymarks A/1 form a red line pointing north, useful for orientation when identifying divebomb pattern (explained below). (They’re used to bait Dive and stack for Beam respectively in phase 1)
Phase 4
- At the start of each rotation (when the boss casts Favor), everyone should stack tightly at A with the MT
- There are no more cleaves in this phase. Prioritise clear positioning and resolving mechanics
- Handle the odd sets of Claws by tank swapping in the middle of the Claw hits. Invuln the even sets of Claws. Odd Claws happen at the start of the rotation, which is significantly less chaotic than for even Claws
- The OT should mit during the Favor castbar, and provoke when they see the first Claw hit, so each tank only takes 2-3 hits
Handling ice/fire:
- We alternate when the stack gets hit by Fireballs to keep Icebitten/Firescorched in check
- There are 2 callouts - “fire out” and “fire in”. Fire out means the fire tether should temporarily leave the stack so Fireball doesn’t hit the stack; fire in means the fire tether should stay stacked
- Fire out on odd Fireballs, and fire in on even Fireballs (i.e. fire out → in → out → in for each rotation). This lines up nicely with the other mechanics
- During fire in, anyone already with Firescorched must adjust by leaving the stack, or it will kill them
- The fire tether who did fire out will likely find they still have Firescorched during the subsequent fire in
- This can also occur due to low deaths and doing fire in correctly, or doing fire out wrongly
- During fire out, anyone with Icebitten can play it safe by joining the fire tether when they leave the stack, to cancel out their Icebitten early
- This can occur due to it being early in the rotation, too many deaths, or doing fire in wrongly
- For Fireball 1 (fire out), the fire tether should run behind the boss, but not too far in case the boss picks them for Raven Dive
- Remember to check for Thunderstruck shortly after every Fireball tether. The callout for this is “thunder out”. Thunder must similarly temporarily leave the stack to not hit anyone
- Hitting the stack with Lightning is almost certainly a wipe
- After Fireball 1, it’s thunder’s turn to run behind the boss, but again not too far or they’ll get hit by donut
- Everyone else should restack back in front of the boss once she uses Raven Dive, to give thunder enough space. She will likely have dived onto the stack, so don’t stay in her hitbox or Lightning will clip you
- After Fireball 2, everyone should spread, letting us naturally resolve Lightning 2, Fireball 3 (fire out), and Lightning 3
- Avoid A so we don’t get blackholes near it
- When you see the second blackhole, immediately sprint to stack at A for Beam. Then stay stacked for Fireball 4 (fire in)
- If you run to A too early, you may cover it with blackholes. Too late, and you’ll miss Beam
Checking divebomb pattern:
- We aim to bait divebombs to the edges of the arena so no one gets hit. There are 3 coloured waymark pairs corresponding to each possible dragon pattern to make baiting easier
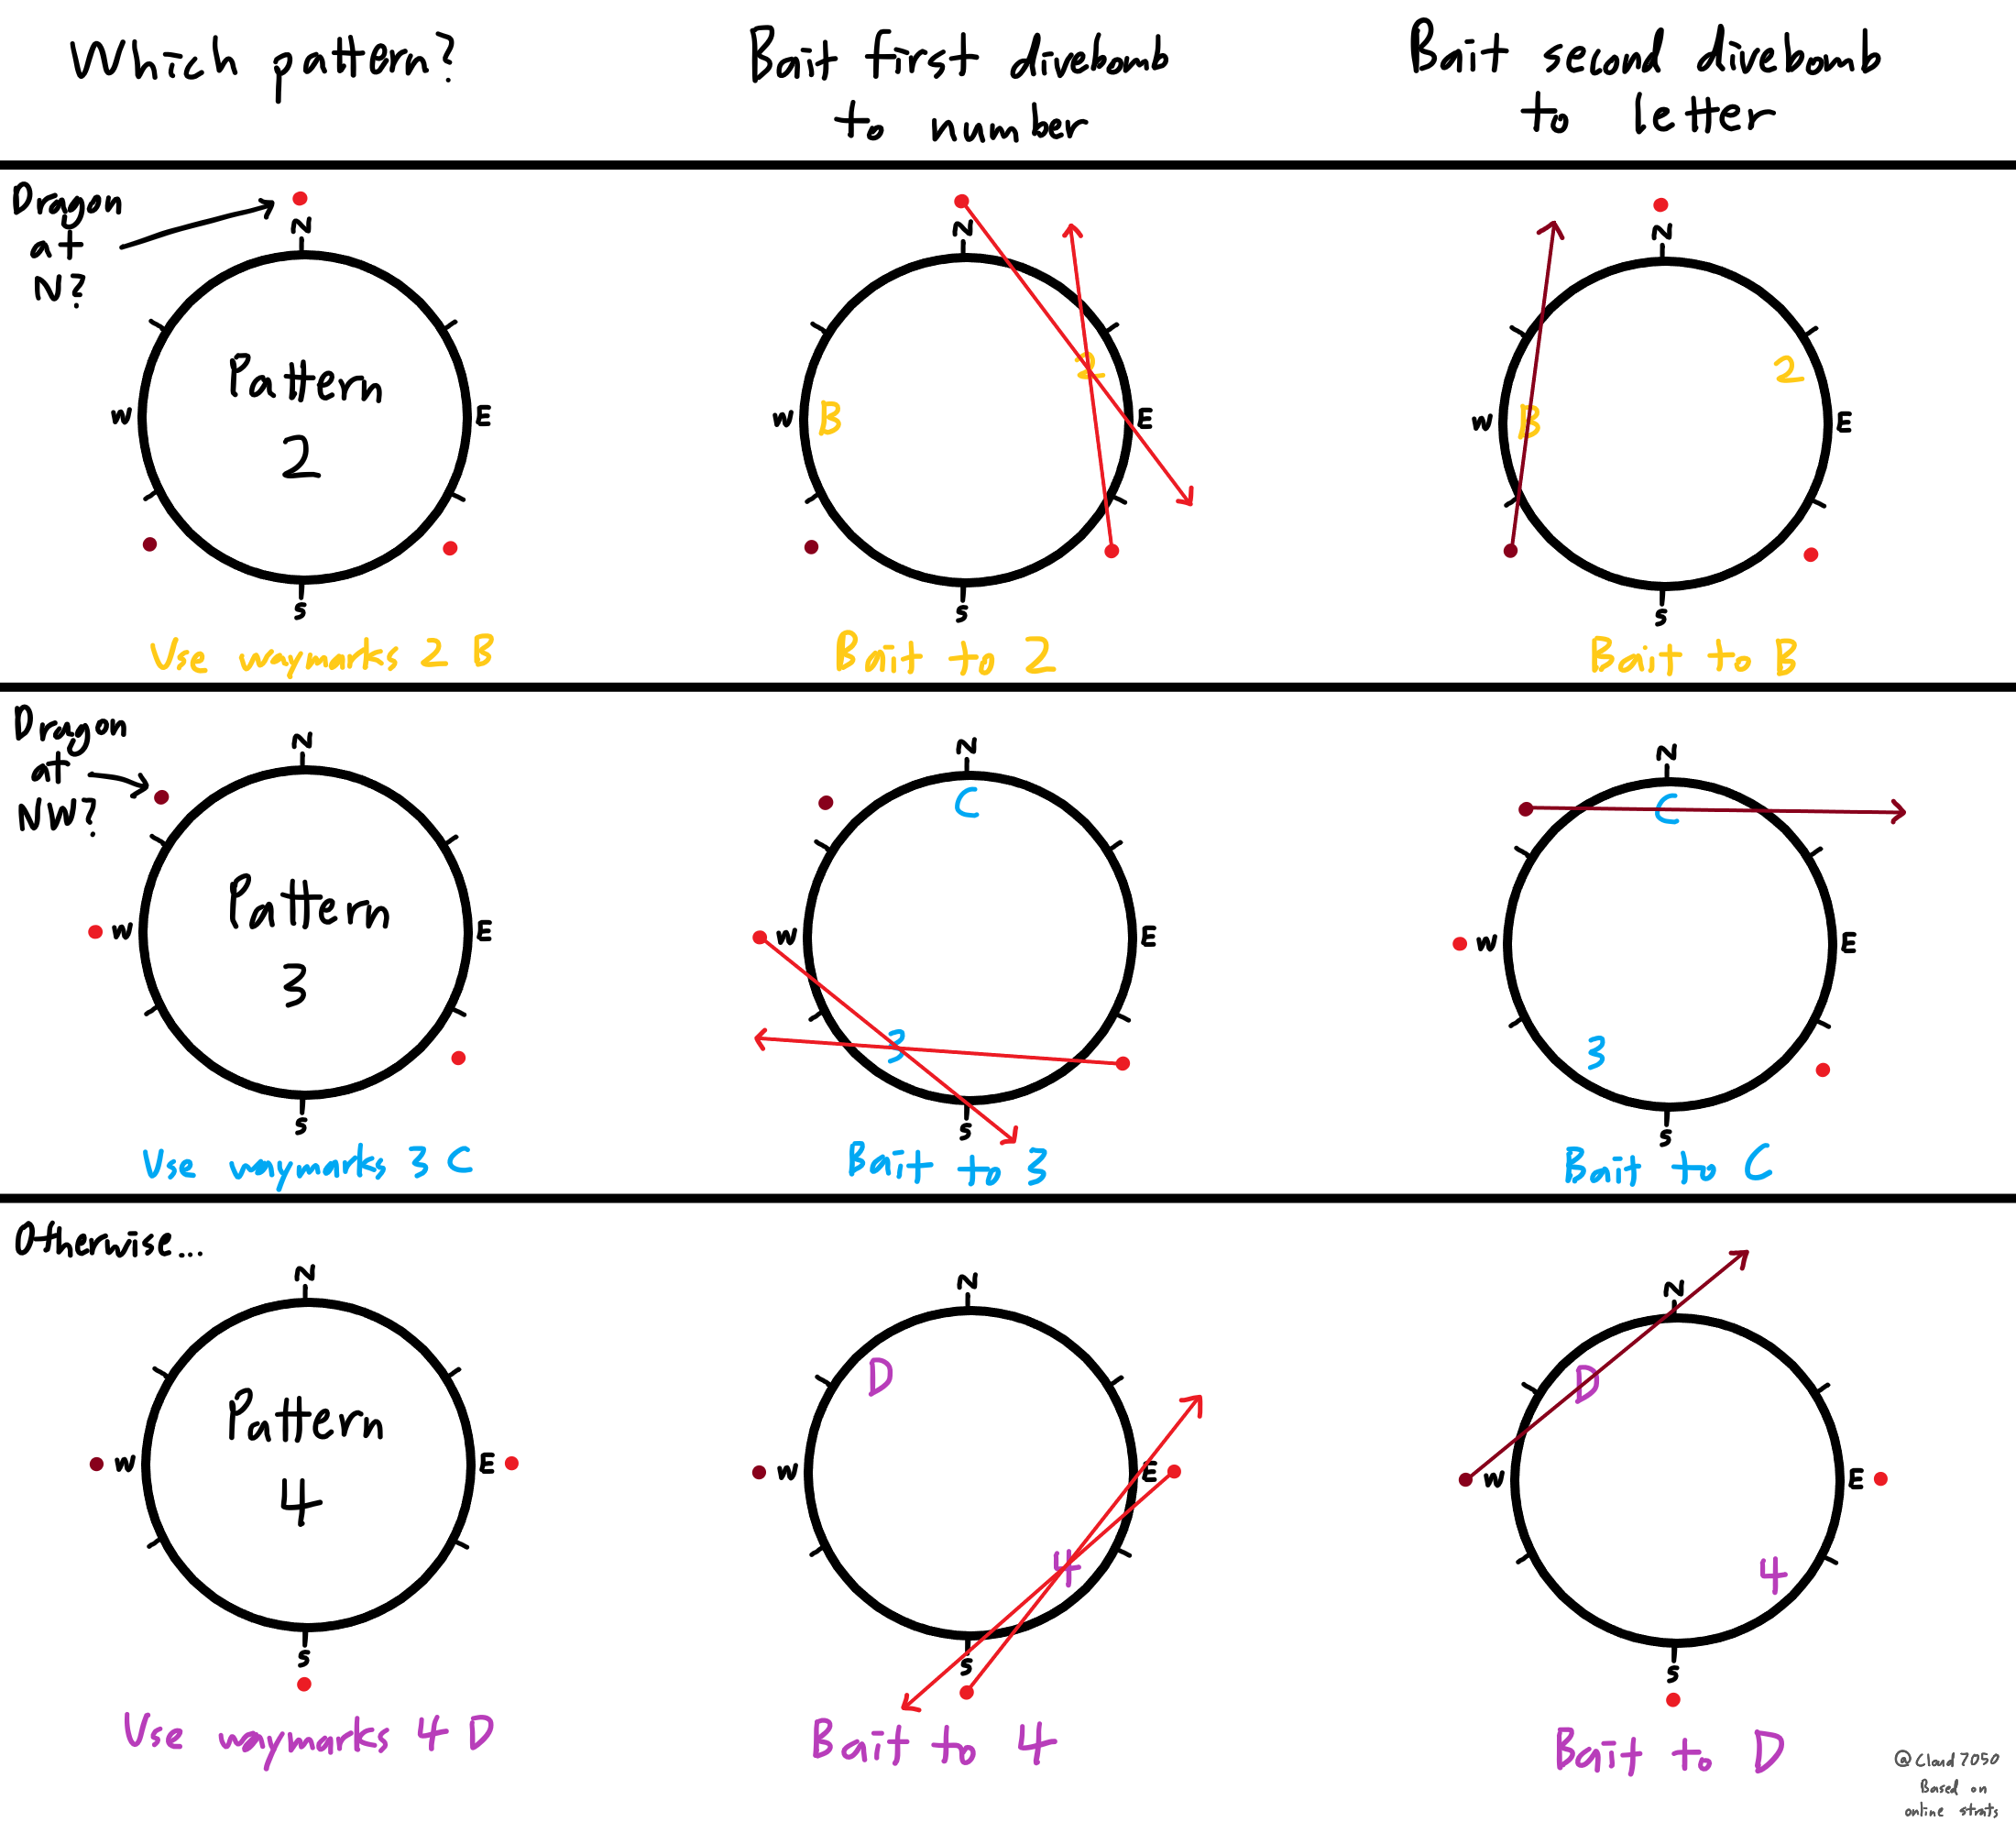
If there’s a dragon north, it’s pattern 2 - use yellow waymarks 2 then B.
If not, then if there’s a dragon northwest, it’s pattern 3 - use blue waymarks 3 then C.
Otherwise it’s pattern 4 - use purple waymarks 4 then D- Before divebombs start, there’s plenty of time to check. You may want to assign a dps to call out the correct waymarks for each rotation in advance
Handling divebombs:
- Bait the first divebombs to the number waymark, then bait the second divebomb to the letter waymark
- If you get a green marker, sprint to the correct waymark and wait for it to disappear, then run back
- After even Claws, everyone should go near the first waymark. Whoever gets the green marker should stand in it, then everyone else can similarly go near the second waymark
- For odd rotation:
- Due to Meteor Streams, stay spread when going near the second waymark, and spread some more after the second green marker appears
- Avoid the MT due to Dalamud Dive
- For even rotation:
- After Raven Dive, immediately run near the boss due to donut. Healers can rescue whoever got the second green marker after it disappears so they don’t get hit by donut on the way back
Other Tips
- If your damage is good such that you’re reaching phase 4 during second Heavensfall, consider holding damage till after it finishes (but before second add spawns) to make the start of phase 4 less chaotic
- Donut snapshots like any other attack, so thunder doesn’t have to wait for the animation. Thunder can run further out once the castbar ends if space is really needed, but the timing is tight
- The green markers work differently from T5 and T13’s divebombs